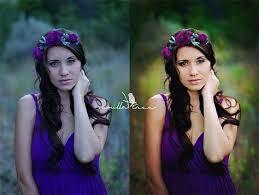
Utilizing Adobe Lightroom 6 For Editing Photos
Import Photos
- 1.1 Transfer Images… Supplement your Memory Card into your PC’s card peruser (regardless of whether it’s incorporated into your machine, or you’re utilizing a module USB memory card peruser).
- 1.2 Start The Import Process, In Lightroom… In the Library tab (got to by means of the upper right arrangement of connections, in Lightroom 6), click on the “Import… ” button.
- 1.3 Add Keywords… Now, I add catchphrases to all relevant photographs, which can be found over in the “right board” of Lightroom. I do this so I can rapidly discover the photographs later (I may not be prepared to process the pictures, at that point, so I regularly get the pictures into Lightroom, so they’re fit to be chipped away at when it’s increasingly advantageous). It’s a lot faster to tap the catchphrase name over in the “right board” in Lightroom, than it is to go chasing through arbitrary organizers to discover where the hell Lightroom saved them.
- 1.4 Import Your Images… Over in the “right board”, click the “Import” button (you’ll discover the catch in the base left corner).
- You’re currently prepared to start creating/handling/altering (anything you desire to call it) your photographs…
Create Photos
2.1 Switch To The Develop Module… At the point when you import pictures, you’ll be in the “Library” module. Be that as it may, you should be in the “Create” module, so as to utilize the preparing apparatuses. In this way, click the mark that says “Create”, from the menu at the upper right of Lightroom’s interface.

Exclusive on tymclyps
2.2 Selecting A Photo Edit… From the “film strip” (running along the base of Lightroom 6), click on a photograph that you might want to alter, and it should show in enormous, in the focal point of Lightroom.
Presently, before I experience the accompanying altering process, I have to call attention to this is “my” method for altering photographs in Lightroom 6; there are numerous ways you can move toward this undertaking; this is the one I utilize constantly, at present, so I will clarify what I do. Be that as it may, when acquainted with the different devices, you may locate your own strategy works all the more naturally for you, so I urge you to keep a receptive outlook as you experience this procedure of creating photographs, and check whether you locate a superior technique for yourself. I ought to likewise bring up that I’m not absolutely in fact keen with regards to utilizing Lightroom. I was told the best way to utilize it and I’ve generally been utilizing a similar strategy, though I changed things marginally to my favored method for working. I can’t clarify why this strategy works, all I know is it functions admirably enough for me, so this is the thing that I keep on doing…
2.3 Adjustments I Do For Multiple Photos At Once… There are a few settings that I realize that I’ll use for each and every photograph that I alter. In this way, to spare a tremendous measure of time, I take the principal photograph in the film strip, and make the accompanying changes.
Change Aspect Ratio… You don’t need to do this, however I very like photographs with a widescreen Film/TV look to them (possibly it’s only a stage I’m experiencing). Anyway, over in the correct board, at the extremely top (over the Basic board of choices), there is the “Yield Overlay” apparatus. Snap the symbol and a sub menu drops down. To one side of the lock symbol, there ought to be a drop down menu of perspective proportion choices, named “Unique”. I click on this, and afterward select “16 x 9”. In the event that I have to, I will reposition the picture, by tapping on it, holding down the left mouse button and hauling the picture to where it looks best. At the point when I’m cheerful, I click the “Done” button, in the base right of the picture window.
Fundamental Menu Settings To Change… I drag the ‘Features” slider to one side (- 100), and the “Shadows” slider to the extremely right (+100).
Tone Curve Menu Settings To Change… At the extremely base of this menu hinder, there is an alternative to change the “Point Curve”. It ordinarily shows “Straight”, as a matter of course. I regularly discover I get generally excellent outcomes when I change to “Solid Contrast”, yet keep a receptive outlook about testing your picture with “Medium Contrast”.
Impacts Menu Settings To Change… I include an exceptionally inconspicuous dim “Post-Crop Vignette” to for all intents and purposes the entirety of my pictures, to help keep the focal point of the picture unpretentiously lighter, on the other hand – this simply has a slight mental impact of pull the eyes inwards, towards the fundamental point of convergence in your pictures. To accelerate this procedure, as opposed to hauling the “Sum” slider, I simply click the territory in the slider, straightforwardly underneath the letter “h” or “l”, of the “Feature Priority” name. This will in general give me the most dependable measure of dim vignetting, that isn’t either too solid nor too non-existent. Yet, as usual, investigation and see what functions admirably for your pictures).
